Initiate Recovery
Last Updated: August 16th, 2024
Customers use AWS Elastic Disaster Recovery (hereafter called DRS) in order to quickly and reliably recover their on-premises or cloud based applications, minimizing downtime and data loss. Using the DRS API endpoint and our Custom Integration, you can trigger DRS failovers and replication jobs from a Cutover runbook task. The task can then also poll the state of the job to understand completion and success.
The purpose of this document is to walk through the steps needed to configure Cutover with DRS. We will also cover the integration points between Cutover and the DRS solution.
Note: The configuration shared in this guide is intended to describe how to set up Cutover to recover on-premise and cloud based applications with AWS DRS. Use this guide as a reference to understand the changes and match to your current configuration where necessary.
Set up your integration in a few easy steps, read on to find out how in just 11 minutes.
Prerequisites
Prior to integration set up, you must have the following:
- Have an understanding of how our Custom Integration works. You can read more here.
- In Cutover, you will need to assign both the Integration Admin and Custom Fields Admin role types to the user who is configuring the integration.
Note: Based on your chosen authorization, our example uses AWS STS authentication.
Prerequisites to be made in AWS DRS
Prior to creating your Custom Integration in Cutover, you will need to make changes in AWS DRS. Please read the following sections to find out what the changes are.
1. You will need to deploy DRS agents on servers that you are looking to have triggered from Cutover. The replication agent must be deployed on every server that you are looking to have set up and should be visible on the DRS console.
2. You will need to create a role that has access to using DRS that Cutover will be using to trigger DRS. This role is created via the Identity and Access Management (IAM) console and that role has full permissions with DRS.
3. Using the role created above for Cutover to call the DRS integration, you now need to include a trust relationship that allows for the Cutover AWS environment to assume this role in the DRS AWS environment.
Once that's done, you can now configure the DRS integration via the Cutover Custom Integration portal.
Steps for creating a custom integration
In order to create a Custom integration, you will need to follow the steps listed below - each step will be explained in more detail further in the guide:
- Set up your integration connection
- Add in an integration action
- Add in your integration settings in the General tab
- Create your Custom Fields
- Include the authorization type to be used by the integration requests in the Authorization tab
- Add in your request properties in the Request tab
- Fill in any polling settings in the Polling tab - (if you are using polling)
Create a custom integration connection
Once the prerequisites are met, you can create your custom integration in Cutover by following these steps:
1. Click Settings (the cog icon at the bottom of the sidebar), then click Integrations.
2. Any previously configured custom integrations will be displayed on the Integrations Connections page.
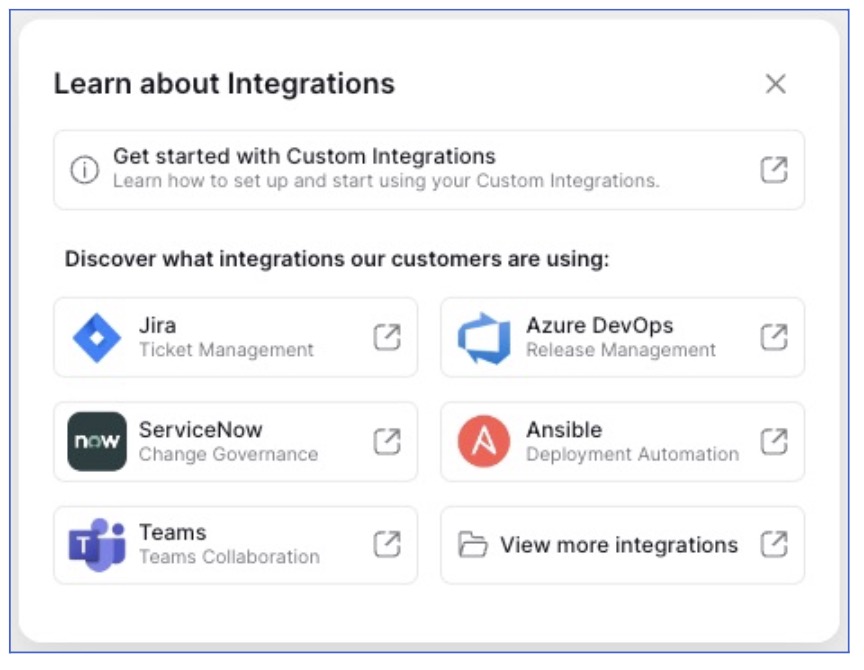
3. To find out how to set up a custom integration or see step by step guides for some of our most requested integrations, click on Learn more at the top of the Integrations Connections page.
4. If you’re ready to build your integration, click Create Integration.

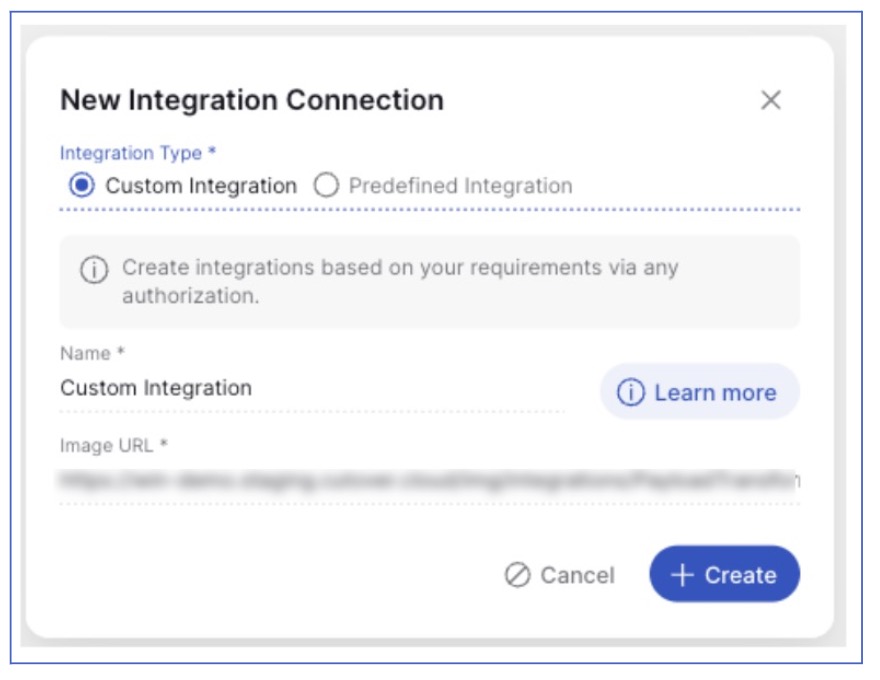
5. The New Integration Connection modal is shown. You can choose from two types of integration:
Custom integration: This type of integration gives you the flexibility to create integrations based on your requirements via any authorization.
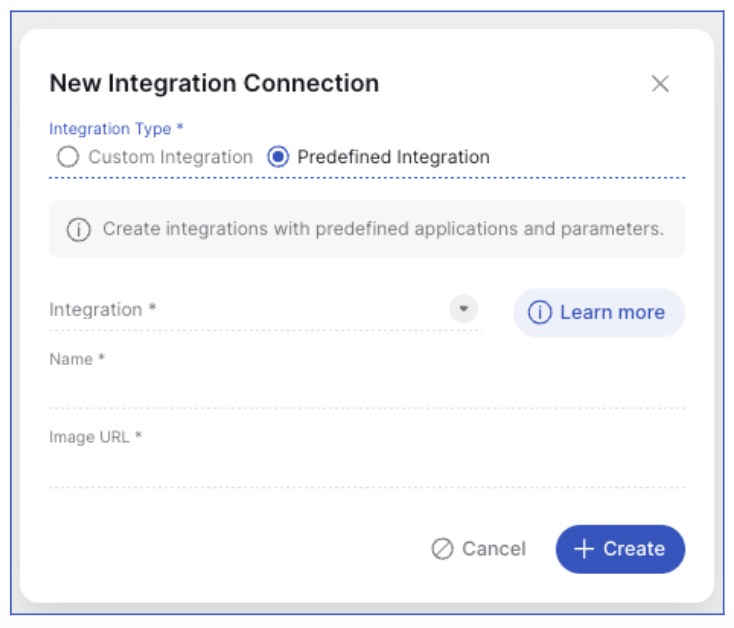
Predefined integration: This type of integration has been set up with predefined fields and default authorization.
To find out more about the types of integration, click the appropriate radio button and then click the Learn more button inside the New Integration Connection modal window.
6. If you select the Predefined Integration radio option, select an integration from the Integration dropdown list. The information required will change depending on the integration chosen. Enter any mandatory fields and click Create.
The newly created integration will be listed at the bottom of the Integrations Connections page.
Note: As this guide is based on our Custom Integration, please see our Help Center for further information on setting up any predefined integrations.
7. If you select the Custom Integration radio option, you will need to enter a name and (optionally) an image URL for your integration (if this is left blank, a default image URL will be displayed). Click CREATE.
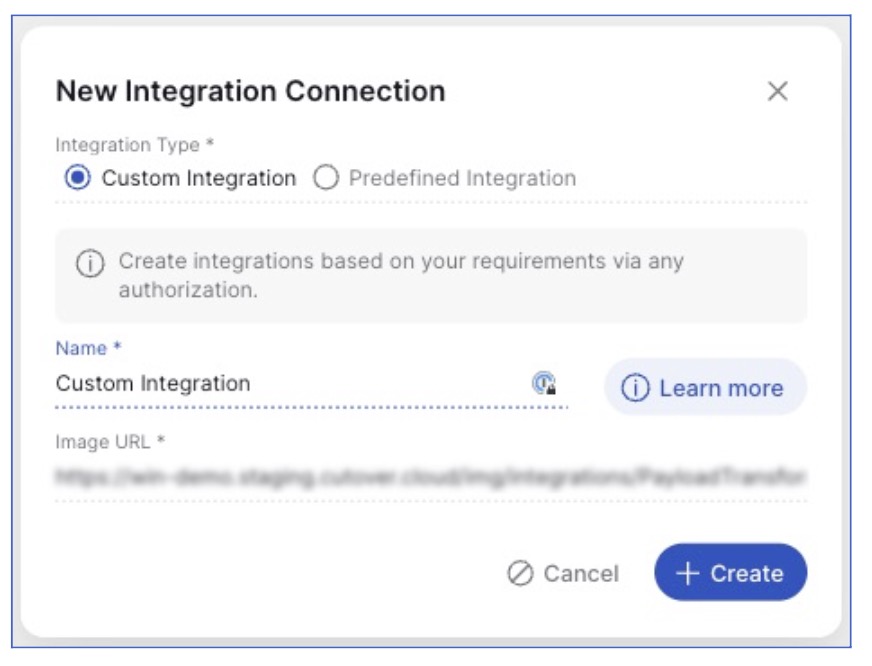
The newly created integration will be listed at the bottom of the Integrations Connections page.
Add an integration action
This section will cover the following example where you can use a Cutover task to trigger AWS DRS Replication jobs.
To do this, add an integration action to your newly created custom integration connection by following these steps:
1. In Settings > Integrations, click on your new custom integration from the list in the Integration Connections screen.
2. In the Edit panel, click + New in the Integration Actions section.

3. In the new action modal, select Build a custom integration from the Action dropdown.
General tab
In the General tab, enter the following details:
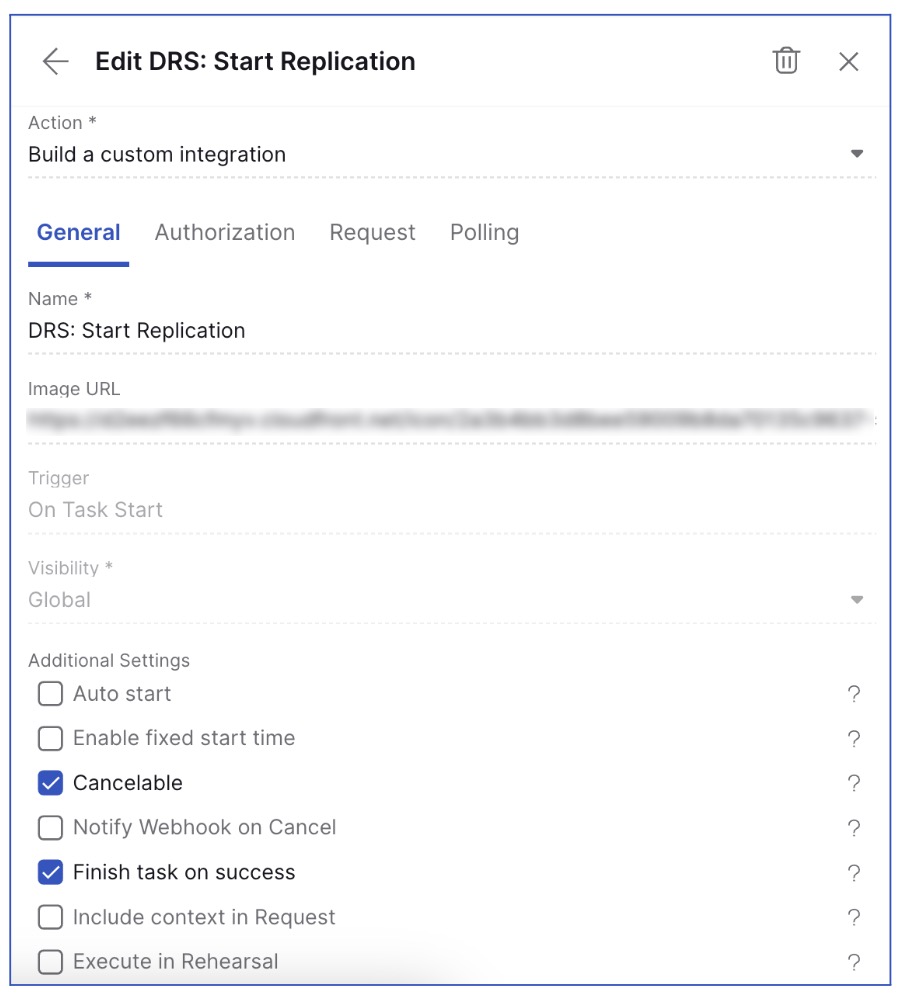
Name: Enter a name for your integration action. In our configuration, we have used the integration action name (DRS- Start Replication).
Image URL: This is the image of the icon that is associated and displayed with the integration action. We would use a URL for our AWS DRS image, you are able to choose an image url of your choice.
Trigger: Select On Task Start.
Visibility: Select which workspace you would like your integration action to appear or select global for your integration to appear in all workspaces.
Note: You cannot change the visibility of an integration action once it has been created. Also, you will need to set up the integration action for every workspace it is required for.
Additional Settings: Ensure that cancelable and finish task on success are selected. These two options are used for the example being configured in this guide, however you may want to add additional options.
Click CREATE.
Create Custom Fields
Before filling out the rest of your integration action, you will need to set up your custom fields. In order to create your custom fields, you will need to make sure you have the Custom Fields Admin role. To read how to set up a custom field, click here.
Below is a list of the custom fields, fields types and additional settings which should be entered when creating the custom fields in our example. You may want to add additional custom fields, depending on your requirements.

Once the above steps are completed, you can navigate back to your integration action - Settings > Integration connection > Integration Action settings.

Authorization tab
Fill out your Authorization tab, in this example we are using Basic authorization.
- Authorization Type: In this example we are using AWS STS SigV4.
- AWS Service Code: To find out the service code for the next field, click here and you can find the specific AWS service code that you need to use. Using our example, as DRS is running in London it will be drs.eu-west-2.amazonaws.com and the service code will be DRS. This will be different depending on your region.
- External ID: Add the ID of the AWS environment that the DRS integration is in.
- Role ARN: For this field, use the role you provisioned earlier.
- Region: Enter the region where the DRS experiment is deployed.
- Click Create.
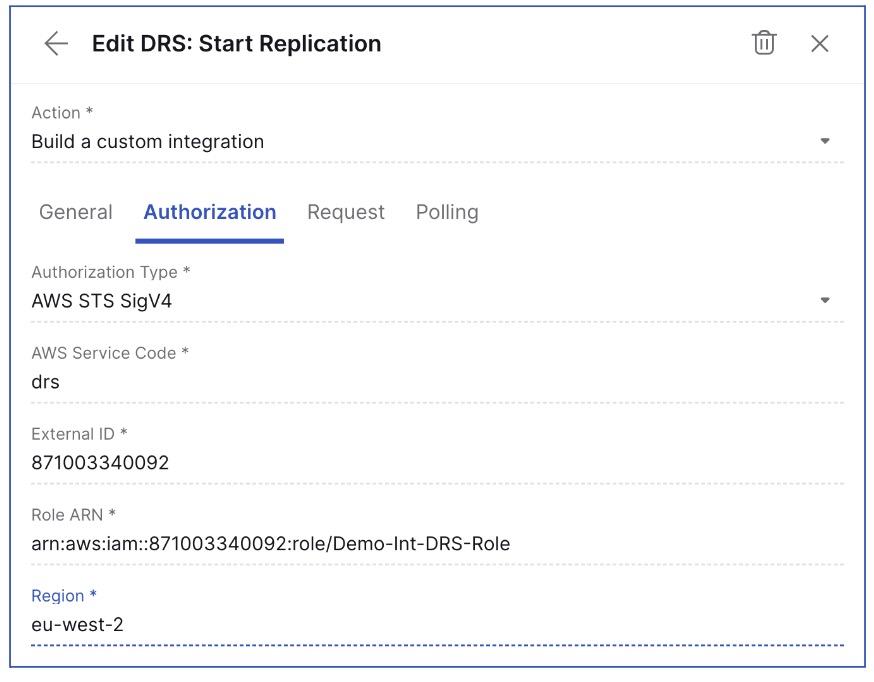
The Authorization settings tab in Cutover allows you to define the type of authorization used by integration requests (in both request and polling phases). To get the best outcome from our Example integrations, we’d like you to use your own authorization set up to fully benefit and see your integration fully working. You can see our Authorization pages on the Developer Portal to find out the options available to you and how to configure these.
Request tab
For the Request tab, see the AWS docs to understand what the request syntax should be. At a minimum you will need a DRS instance ID and you’ll need to specify if this will be a Drill or an actual recovery (more details here on drills and the importance of them to prepare for failover) for the Outbound payload.
The URL will be the API endpoint that you want to interact with and in this scenario that would be DRS /StartRecovery.
The DRS instance ID (which will be the ID of the servers where the DRS agents have been deployed in AWS) can be found via the DRS console from looking at source server details. You can create this as a custom field in Cutover so that you can dynamically input and pass the DRS Instance ID from a Cutover task. For further information, see our Custom Fields help center article.
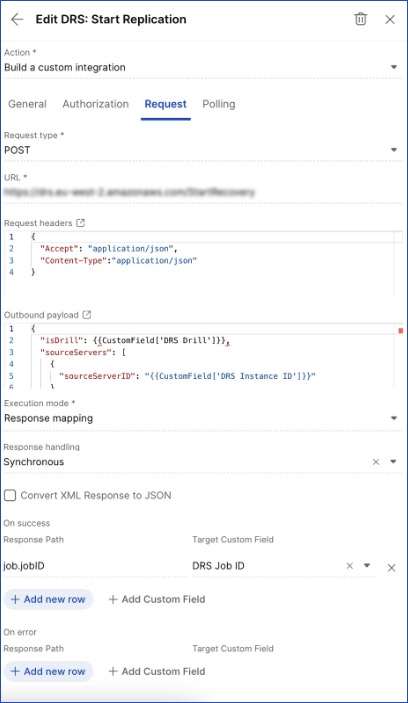
In addition, you can choose to map the outbound payload to additional custom fields. You can choose the response mapping option to map any inbound responses to custom fields you create. In our example we want to (on success) pass the jobID of the DRS job that gets instantiated into the Cutover console as well and map it to a custom field(DRS Job ID).
1. In ‘Execution mode’, set this to Response mapping as this example will return the Job ID.
2. Set the ‘Response handling’ to be Synchronous as you want the response to be returned immediately.
3. Click ‘Add new row’ under the ‘On success’ section to insert your response parameters.
4. In our example, we have used the DRS Job ID custom field.
Polling tab
Polling can also be set up for custom integrations and this allows us to poll endpoints for things like job status. In our Polling tab you can set this up as shown below. The URL will be the API endpoint for DRS DescribeJobs. In the outbound payload you’ll see we are passing the Custom Field DRS Job ID that we response mapped to in our previous Request tab. Furthermore, you should define that you want the callback to be Synchronous and since these jobs tend to be longer running you can set the polling interval to be every minute. Finally you should set up a stop condition for the polling to be able to complete the integration. In this case we can set that to stop polling once the job status returns COMPLETED. You will need to understand what gets returned from AWS, in order to be able to parse for the COMPLETED value. In this example it is an array called items, so we can use items[0].status in the response path, map it to our custom field and then set the condition value to be COMPLETED.

Using our guide to set this up, you can now trigger DRS recovery jobs from Cutover as part of your larger recovery/failover orchestration.
Next steps
In this guide you have learned how to successfully build and set up the AWS DRS integration. By following the steps, you should now have a functional integration. You should thoroughly test your integration and address any issues that may arise during the testing phase.
We encourage you to maintain detailed documentation of your integration configuration and any changes you make in the future. This will be invaluable for troubleshooting and maintenance.
If you are interested in integrations and would like to create further integrations in Cutover, please get in touch with your Customer Success Manager (CSM).
If you would like to know more about Cutover please contact info@cutover.com.
Thank you for using this guide, and we wish you every success with your integration project. If you have any feedback or suggestions for improving this documentation, please feel free to send it to docs@cutover.com.
