Launch a job template
Last updated: February 22nd, 2024
Customers use the Ansible (AWX) integration to orchestrate automation, increase visibility and ensure control of their IT environments with the accurate implementation of software. This helps to support the entire deployment lifecycle which enables teams to plan, develop, test, deliver, and deploy software efficiently.
Using the Ansible API and Cutover’s Custom Integration, we will show you how to use a Cutover task in your runbook to launch an Ansible job from a template during a live execution. Once the Cutover task is triggered, a HTTP Post request will be sent to Ansible to create your job from the template and return the newly created Ansible job ID and then poll for the status. Once the status of the job has been set to ‘successful’ or ‘failed’, the Cutover task will be completed.
Note: The configuration shared in this guide is intended to describe how to set up Cutover for the example mentioned. Use this guide as a reference to understand the changes and match to your current configuration where necessary.
Set up your integration in 7 easy steps, read on to find out how in just 9 minutes.
Prerequisites
Prior to integration set up, you must have/do the following:
- Have an understanding of how our Custom Integration works.
- In Cutover, you will need to assign both the Integration Admin and Custom Fields Admin role types to the user who is configuring the integration.
- If you are using oAuth as a chosen authorization method ensure you have the OAuth application created in your Ansible - see the Authorization tab section to setup your OAuth app in Ansible.
- Configure Ansible to have your own required mandatory fields for example: AWX Job Template ID, AWX Job ID, and AWX Status
Steps for creating a custom integration
In order to create a Custom integration, you will need to follow the steps listed below:
- Set up your integration connection
- Add in your integration action
- Add in your integrations settings in the General tab
- Create your Custom fields
- Include the authorization type to be used by the integration requests in the Authorization tab
- Add in your request properties in the Request tab
- Fill in any polling settings in the Polling tab - (if you are using polling)
Create a custom integration connection
Once the prerequisites are met, you can create your custom integration in Cutover by following these steps:
1. Click Settings (the cog icon at the bottom of the sidebar), then click Integrations.
2. Any previously configured custom integrations will be displayed on the Integrations Connections page.
3.To find out how to set up a custom integration or see step by step guides for some of our most requested integrations, click on Learn more at the top of the Integrations Connections page .
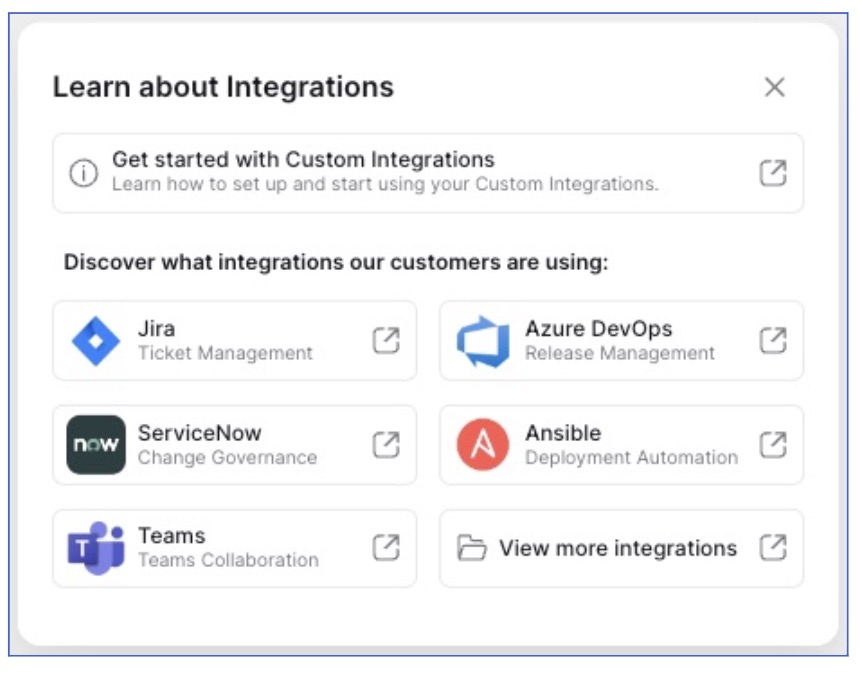
4. If you’re ready to build your integration, click Create Integration.

5. The New Integration Connection modal is shown. You can choose from two types of integration:
Custom integration: This type of integration gives you the flexibility to create integrations based on your requirements via any authorization.
Predefined integration: This type of integration has been set up with predefined fields and default authorization.
To find out more about the types of integration, click the appropriate radio button and then click the Learn more button inside the New Integration Connection modal window.
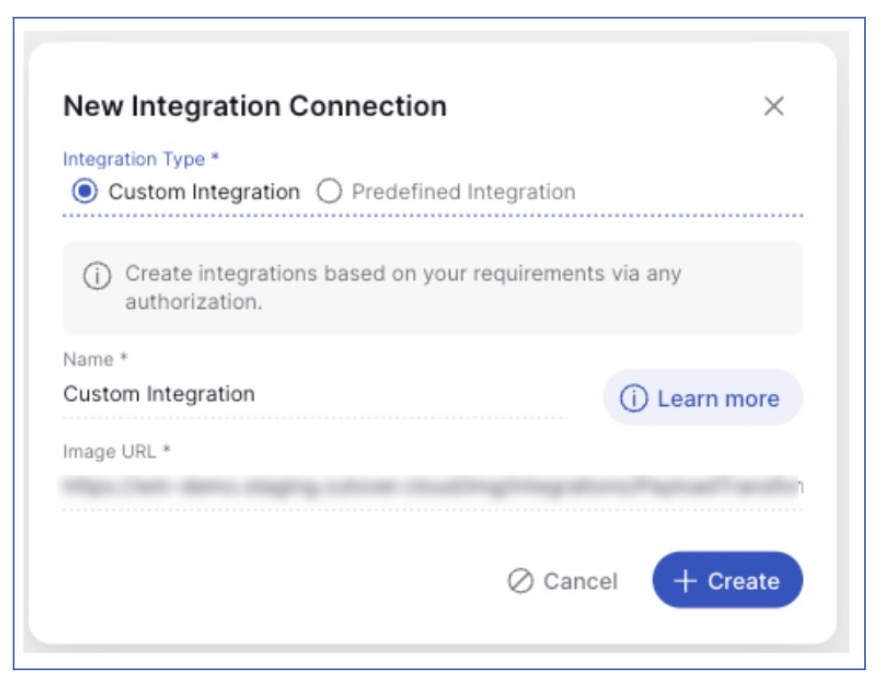
6. If you select the Predefined Integration radio option, select an integration from the Integration dropdown list. The information required will change depending on the integration chosen. Enter any mandatory fields and click Create.
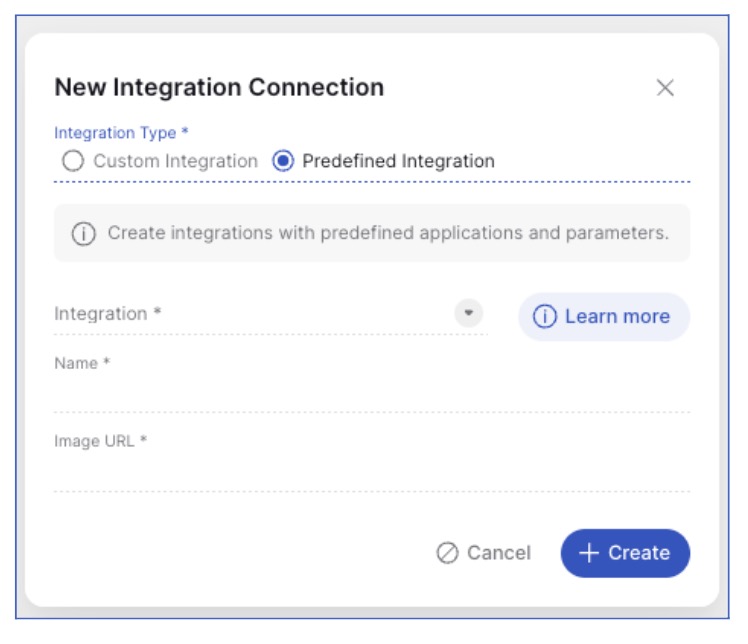
The newly created integration will be listed at the bottom of the Integrations Connections page.
Note: As this guide is based on our Custom Integration, please see our Help Center for further information on setting up any predefined integrations.
7. If you select the Custom Integration radio option, you will need to enter a name and (optionally) an image URL for your integration (if this is left blank, a default image URL will be displayed). Click CREATE.
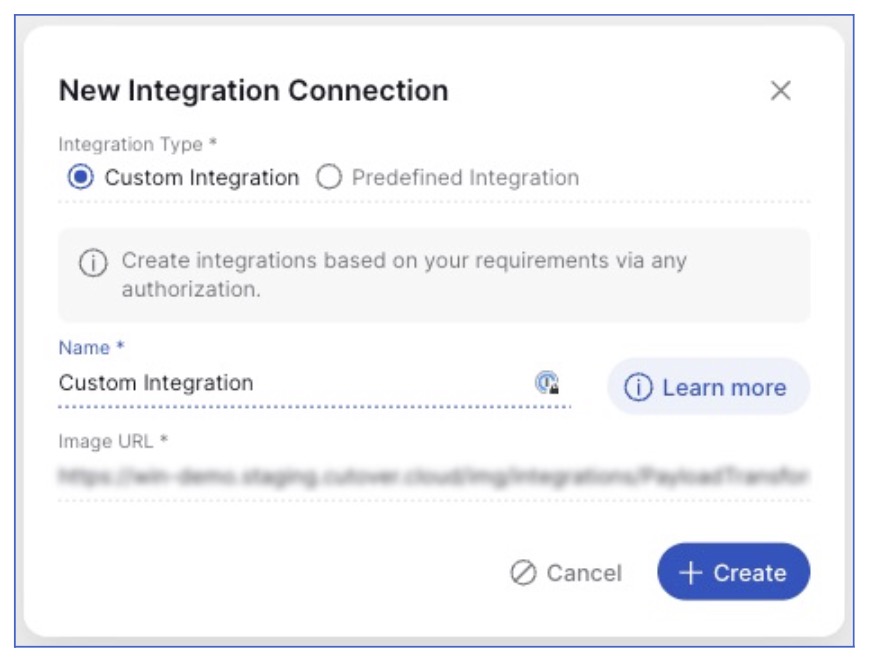
The newly created integration will be listed at the bottom of the Integrations Connections page.
Add an integration action
This section will cover the following example where you can use a Cutover task to create a job from an Ansible template, return the Job ID and then poll for the status.
To do this, add an integration action to your newly created custom integration connection by following these steps:
1. In Settings > Integrations, click on your new custom integration from the list in the Integration Connections screen.
2. In the Edit panel, click + New in the Integration Actions section.
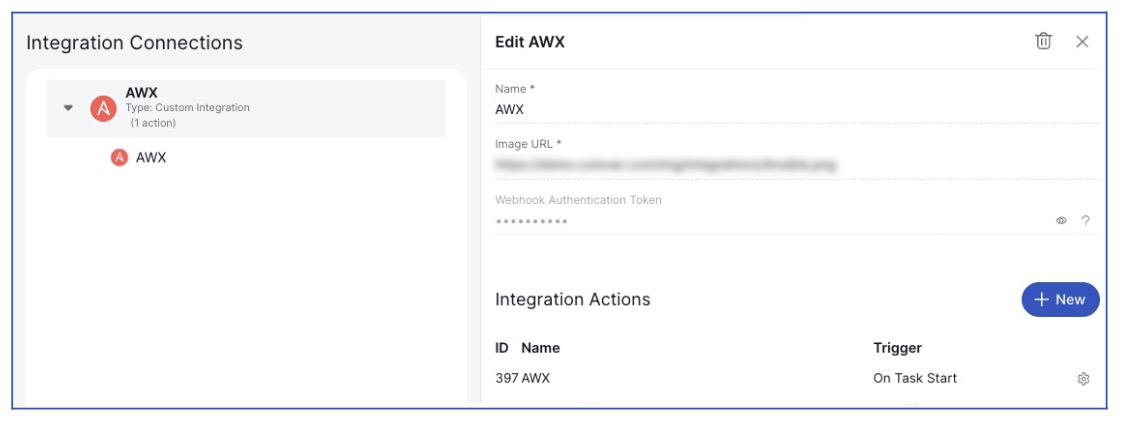
3. In the new action modal, select Build a custom integration from the Action dropdown.
General tab
In the General tab, enter the following details:
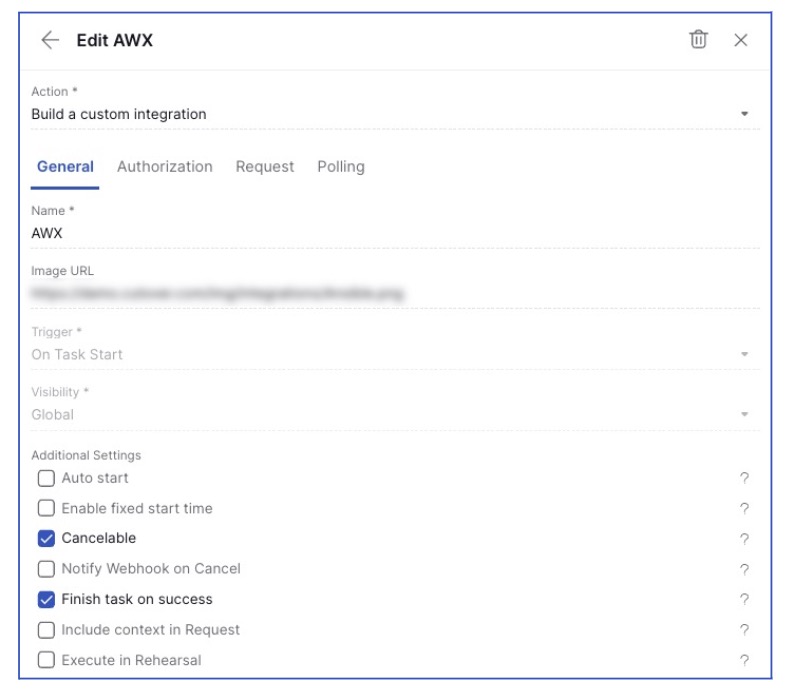
Name: Enter a name for your integration action. In our configuration, we have used the integration action name ‘AWX’.
Image URL: This is the image of the icon that is associated and displayed with the integration action, in this example we have used our Ansible image - but you are able to choose an image url of your choice.
Trigger: Select On Task Start.
Visibility: Select which workspace(s) you would like your integration action to appear or select global for your integration to appear in all workspaces.
Note: Please note that you cannot change the visibility of an integration action once it has been created. Also, you will need to set up the integration action for every workspace it is required for.
Additional Settings: Ensure that Cancelable and Finish task on success are selected. These two options are used for the example being configured in this guide, however you may want to add additional options.
Click CREATE.
Create custom fields
Before filling out the rest of your integration action, you will need to set up your custom fields. These are the custom fields which relate to the three Ansible fields mentioned in the Prerequisites section. These custom fields will match up with our mandatory fields when creating a job in Ansible.
In order to create your custom fields, you will need to make sure you have the Custom Fields Admin role.
Note: You can read more about creating custom fields in our Help Center.
Below is a list of the custom fields, fields types and additional settings. This information should be entered when creating the custom fields in the above example:
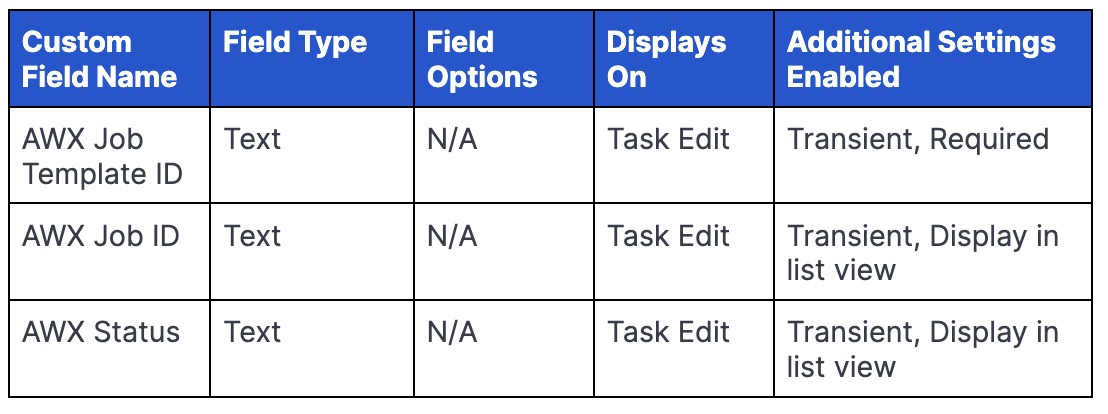
Once the above steps are completed, you can navigate back to your integration action - Settings > Integration connection > Integration Action settings.
Authorization tab
In this example we are using OAuth.
Before setting this up in Cutover, you will need to go into your Ansible configuration and create your OAuth application. For further information on AWX OAuth please read AWX Token-Based Authentication.
In order to use OAuth for the AWX Integration you first need to create an app in AWX as described here in Creating New Application. Depending on how your AWX has been configured, this step may require an Admin to complete.
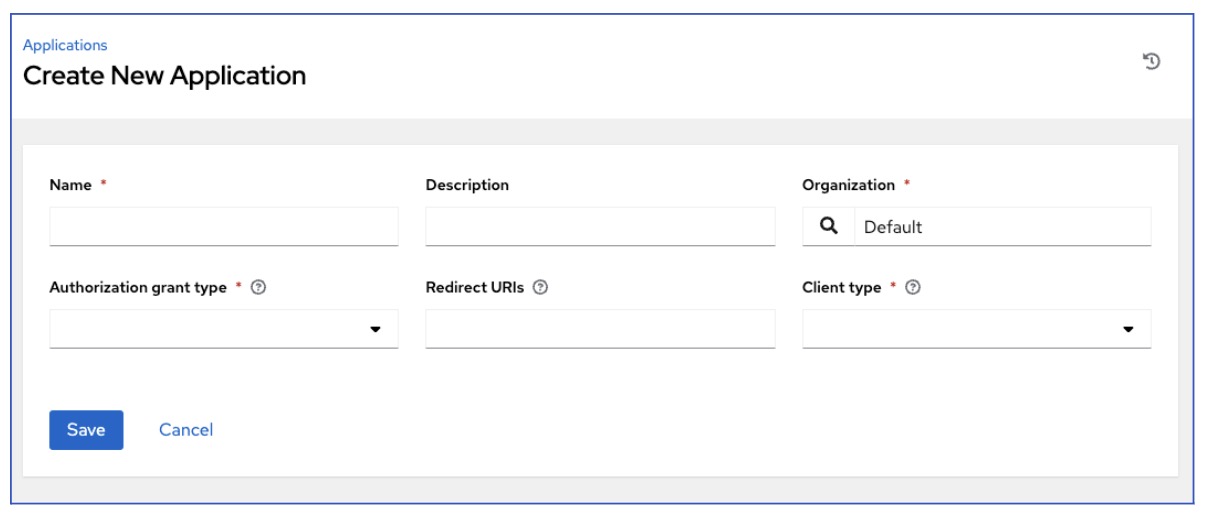
Enter the following details into the Create New Application section:
Name: Cutover
Description: Appropriate Description (Cutover OAuth client)
Organization: Default (But you can change this)
Authorization Grant Type: Authorization code
Redirect URIs: https://{CutoverInstanceName}/api/integrations/oauth/authentications/payload_transformer/callback
Client type: Confidential
Authorized Scopes : Write
It is important that the correct scopes are selected for this example, the meanings of each of the scopes are documented here: AWX Scope.
You are now ready to populate the Authorization tab in your integration action. The Authorization settings tab in Cutover allows you to define the type of authorization used by integration requests (in both request and polling phases). To get the best outcome from our Example integrations, we’d like you to use your own authorization set up to fully benefit and see your integration fully working. You can see our Authorization pages on the Developer Portal to find out the options available to you and how to configure these.
1. Once this has been setup, fill in your OAuth settings. In our example, we have used OAuth:
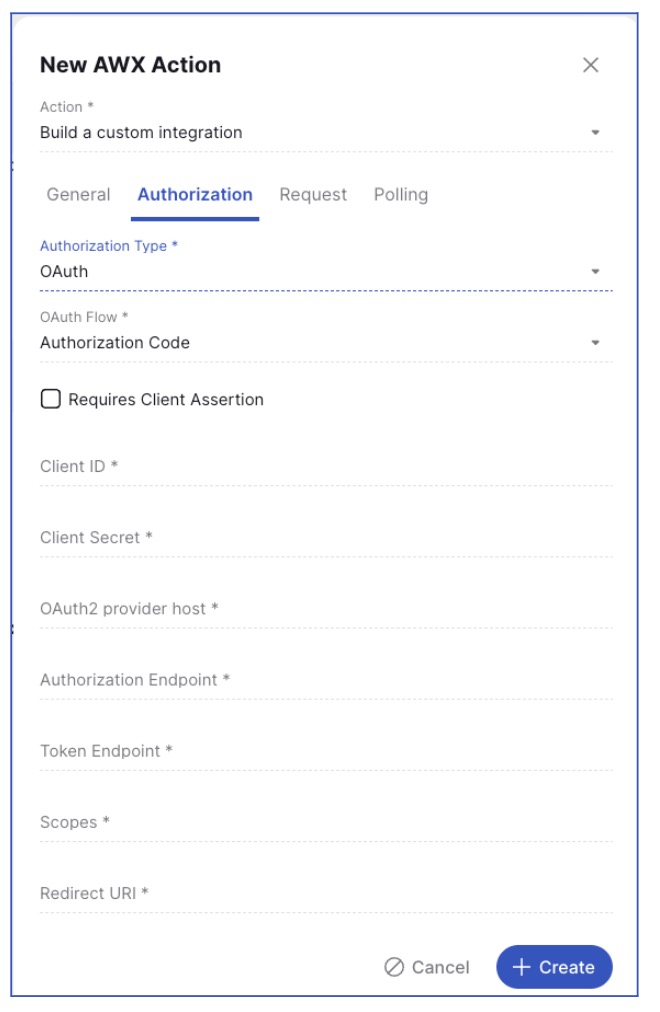
Client ID: The ID provided by the third party OAuth provider. This refers to the App Id in the Application Information that was previously set.
Client Secret: The secret associated with the client ID.
OAuth2 provider host: This is the base URL for the OAuth provider (e.g. https://awx-environment.cloud)
Authorization endpoint: The endpoint defined by the OAuth provider to perform authorization (e.g. /api/o/authorize/)
Token endpoint: The endpoint defined by the OAuth provider to exchange the authorization token for an access token (e.g. /api/o/token/)
Scopes: The types of operations that Cutover will be allowed to perform on behalf of an authorized user. Scopes are defined by the OAuth provider and usually allow restricted permissions to certain functions (e.g. read, write, profileAccess, etc.)
Redirect URI: The URI that the OAuth provider must redirect to after the authorization step, where {YourClientInstance} is the base URL for your Cutover instance.
https://{YourCutoverinstance}/api/integrations/oauth/authentications/payload_transformer/callback
2. Once the OAuth tab has been set up, you can now either authenticate at two levels:
- At the Custom Integration Level - Functional User, so all executions of the integration will use the same oAuth credentials or;
- At a task level - Task User, where each user wishing to execute the integration must authenticate
Authenticating as a functional user
When authenticating as a functional user, the same user’s credentials are used each time the integration is executed. To authenticate as a functional user, click on the ‘Authenticate’ button in the OAuth tab of the Custom Integration.
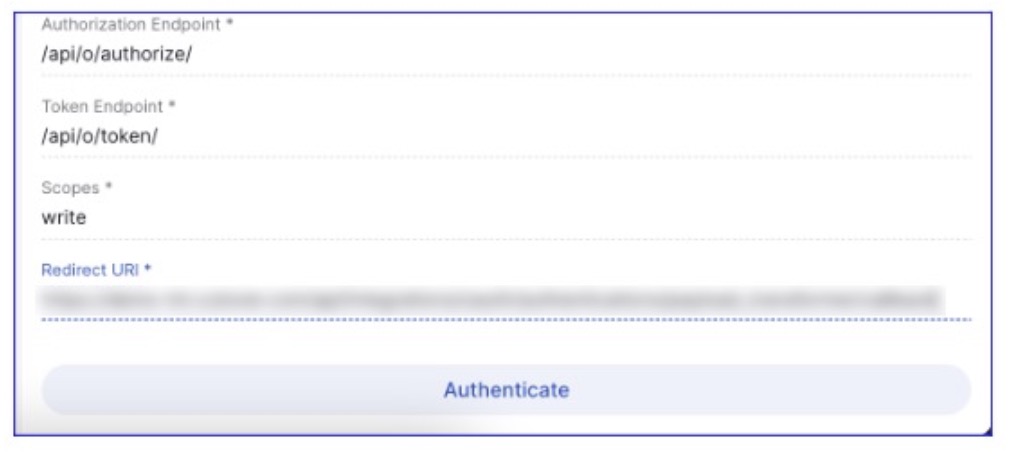
Once this is done it will look like this:
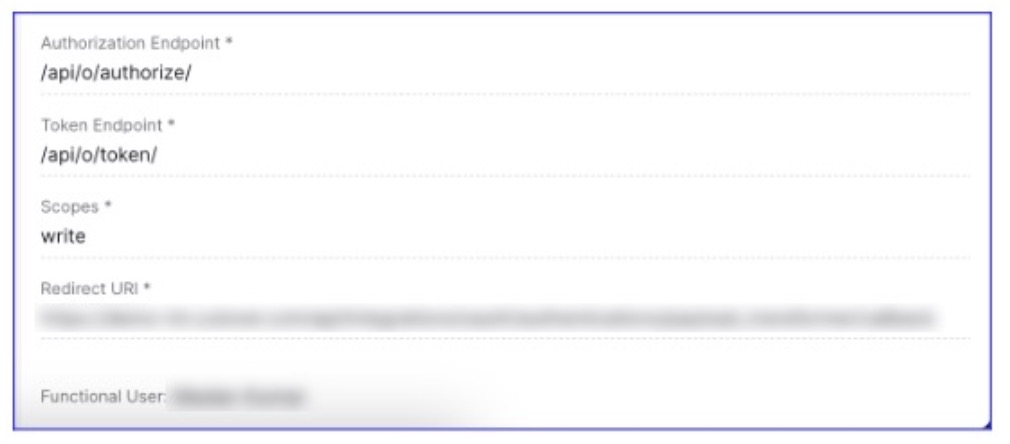
Authenticating as a task user
When authenticating as a task user, each individual who wants to execute the integration will need to authenticate. When required, each user can do this by navigating to the task in the runbook and clicking on the ‘Authenticate’ button.

Request tab
1. Select your chosen request type, in this example we are using a HTTP POST request.
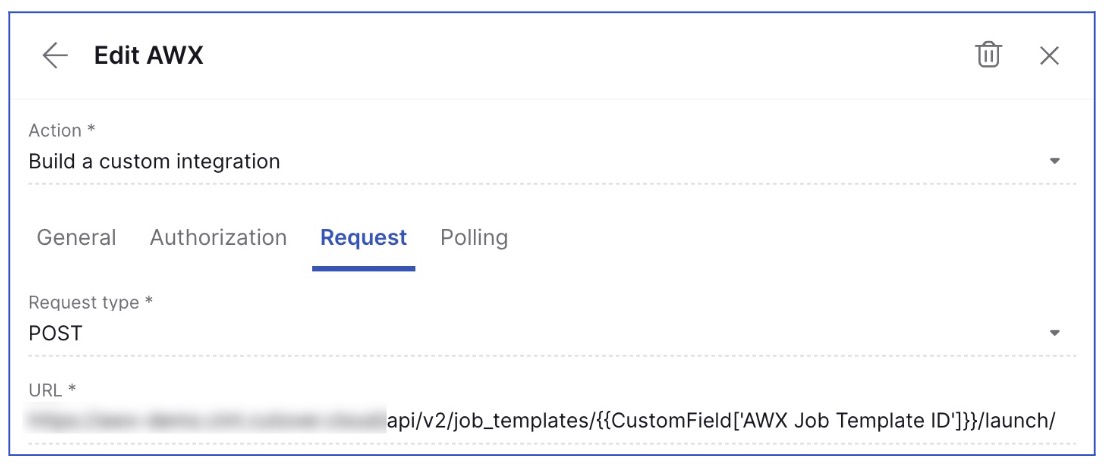
2. Fill in your URL: https://{awx-environment-endpoint}/api/v2/job_templates/AWX TemplateID/launch/
- In this guide we are using Custom Integration variables, therefore our URL in this example the URL would be: https://{awx-environment-endpoint}/api/v2/job_templates/{{CustomField['AWX Job Template ID']}}/launch/
As AWX Job Template ID is a custom field attached to the task, this allows the possibility of each task running a separate job that is defined in a template. The coding to represent a custom field value is {{Custom Field[‘FieldName’]}}.
3. In the request header, fill in your request headers as defined by Ansible:
{"Content-Type": "application/json", "Accept": "application/json"}
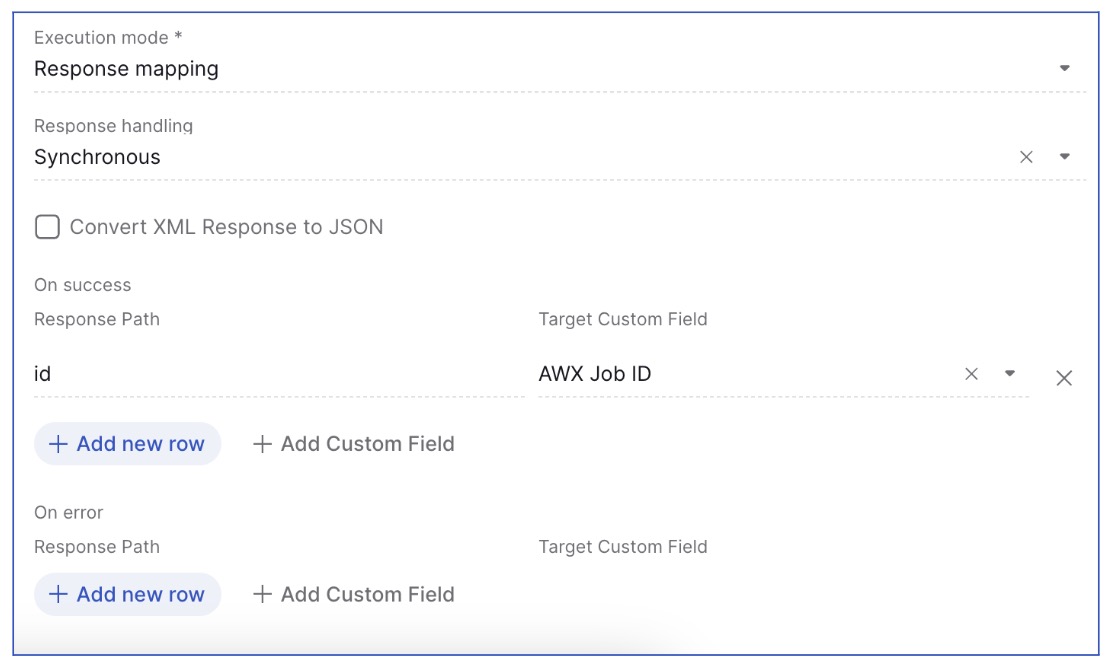
4. In the ‘Execution mode’, set this to Response mapping as this example will return the new created Job ID.
5. Set the ‘Response handling’ to be Synchronous as we want the response to be returned immediately.
6. Click ‘Add new row’ under the ‘On success’ section to insert your response parameters.
7. In this example we use the Job ID custom field.
Polling tab
1. Tick ‘Use Polling’
2. Set the request type to GET (as we want to retrieve the Job status from the Job ID)
3. URL: Enter the API URL of your Ansible instance (https://{awx-environment-endpoint}/api/v2/jobs/{{CustomField['AWX Job ID']}}
Note: We have used dynamic fields in the URL for the Job ID as this already exists since the Create Job from template integration action included the creation of this custom field — as a result, this field will need to be included, but won’t need to be created again.

4. Set the ‘Request headers’ to the same as the previous request tab e.g:
{"Content-Type": "application/json", "Accept": "application/json"}

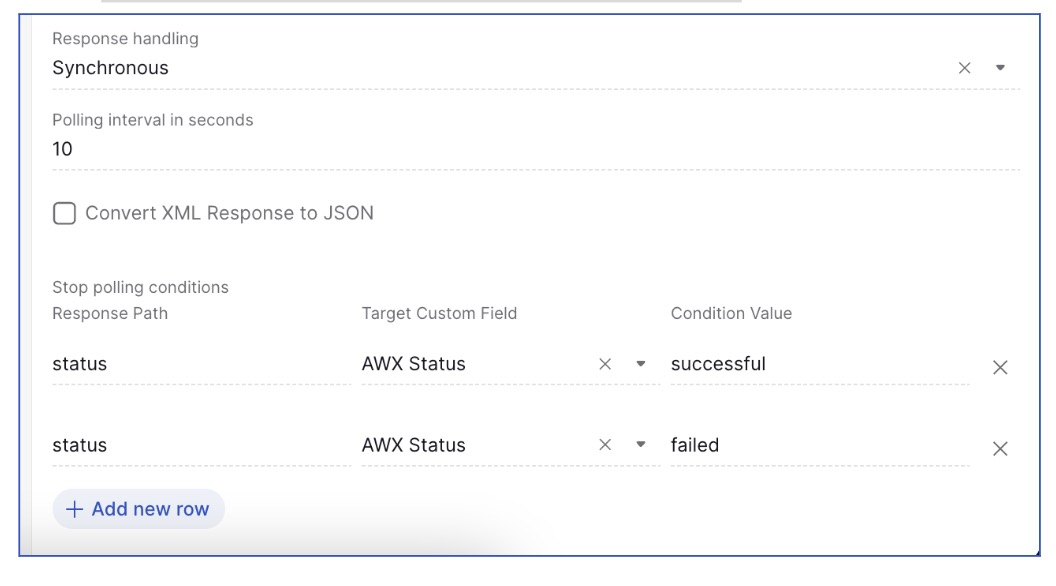
5. Set the ‘Response handling’ to Synchronous
6. Set the polling interval to your requirements, in this example we have set this up to poll for the status every 10 seconds
7. Set your ‘Stop polling conditions’. For this example we have chosen to poll for just the status and have set the condition values to ‘successful’ and ‘failed’. This means that when the Job status has been set to this condition, the Cutover task will be completed.
Next steps
In this guide you have learned how to successfully build and set up the Azure DevOps integration. By following the steps, you should now have a functional integration. You should thoroughly test your integration and address any issues that may arise during the testing phase. We encourage you to maintain detailed documentation of your integration configuration and any changes you make in the future. This will be invaluable for troubleshooting and maintenance.
If you are interested in integrations and would like to create further integrations in Cutover, please get in touch with your Customer Success Manager (CSM).
If you would like to know more about Cutover please contact info@cutover.com.
Thank you for using this guide, and we wish you every success with your integration project. If you have any feedback or suggestions for improving this documentation, please feel free to send it to docs@cutover.com.
