Jira integration
Customers use the Jira integration to greatly increase visibility into their software development life cycle ensuring accurate task execution and acceleration of the software release process. This helps to unlock devops productivity, streamline IT processes, and increase the visibility of data and incident management.
Using the Jira API and our Custom Integration, we will show you how to use a Cutover task in your release runbook to create a Jira ticket (task, bug or story) during a live execution. Once the Cutover task is triggered, a HTTP Post request will be sent to Jira to create your issue and then return the newly created ticket ID and then poll for the status. Once the status of the issue is set to Done, it will complete the task.
Note: The configuration shared in this guide is intended to describe how to set up Cutover for the example mentioned. Use this guide as a reference to understand the changes and match to your current configuration where necessary.
Set up your integration in 7 easy steps, read on to find out how in just 8 minutes.
Prerequisites
Prior to integration set up, you must have/do the following:
- Have an understanding of how our Custom Integration works.
- In Cutover both the Integration Admin and Custom Fields Admin role types need to be allocated to the user who is configuring the integration.
- We have based this example on using the native Jira API call however, if you use an API gateway or similar, you will need to find the corresponding APIs for this.
- You will need permission to create API tokens in Jira in your Atlassian account settings.
- You will need to Base64 encode your API token
Note: Based on your chosen authorization, our example uses basic authentication, however you can choose your own authentication method
- Configure Jira to have your own required mandatory fields: Summary, Description, Priority, Label
Note: The above mandatory fields listed are for the purpose of setting up this example integration. You may require different mandatory fields depending on your needs. You will need to create custom fields in Cutover which will correspond with these Jira fields - see this section further down.
Steps for creating a custom integration
In order to create a Custom integration, you will need to follow the steps listed below - each step will be explained in more detail further in the guide:
- Set up your integration connection
- Add in an integration action
- Add in your integration settings in the General tab
- Create your Custom Fields
- Include the authorization type to be used by the integration requests in the Authorization tab
- Add in your request properties in the Request tab
- Fill in any polling settings in the Polling tab - (if you are using polling)
Create a custom integration connection
Once the prerequisites are met, you can create your custom integration in Cutover by following these steps:
1. Click Settings (the cog icon at the bottom of the sidebar), then click Integrations.
2. Any previously configured custom integrations will be displayed on the Integrations Connections page.
3.To find out how to set up a custom integration or see step by step guides for some of our most requested integrations, click on Learn more at the top of the Integrations Connections page .
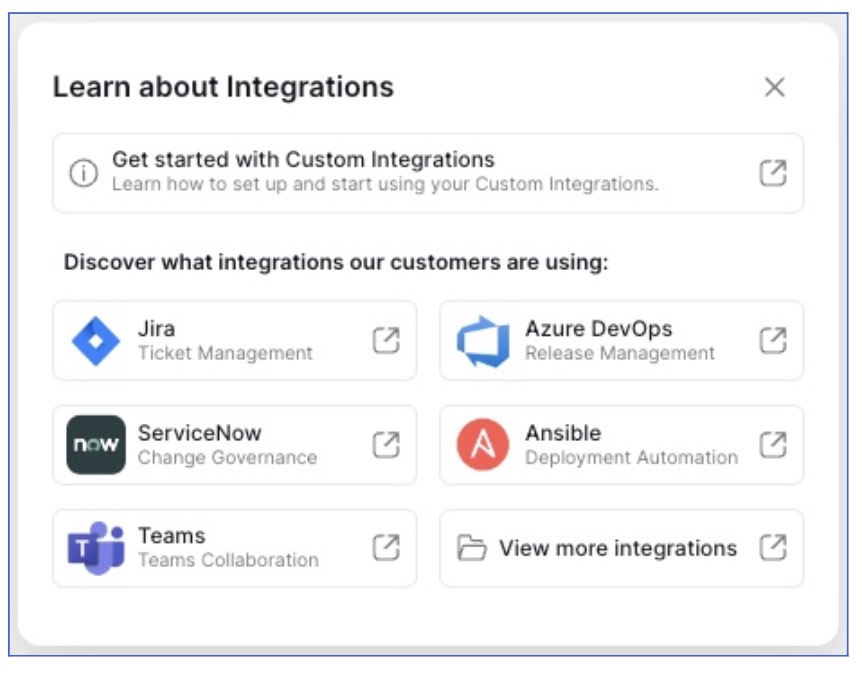
4. If you’re ready to build your integration, click Create Integration.

5. The New Integration Connection modal is shown. You can choose from two types of integration:
Custom integration: This type of integration gives you the flexibility to create integrations based on your requirements via any authorization.
Predefined integration: This type of integration has been set up with predefined fields and default authorization.
To find out more about the types of integration, click the appropriate radio button and then click the Learn more button inside the New Integration Connection modal window.
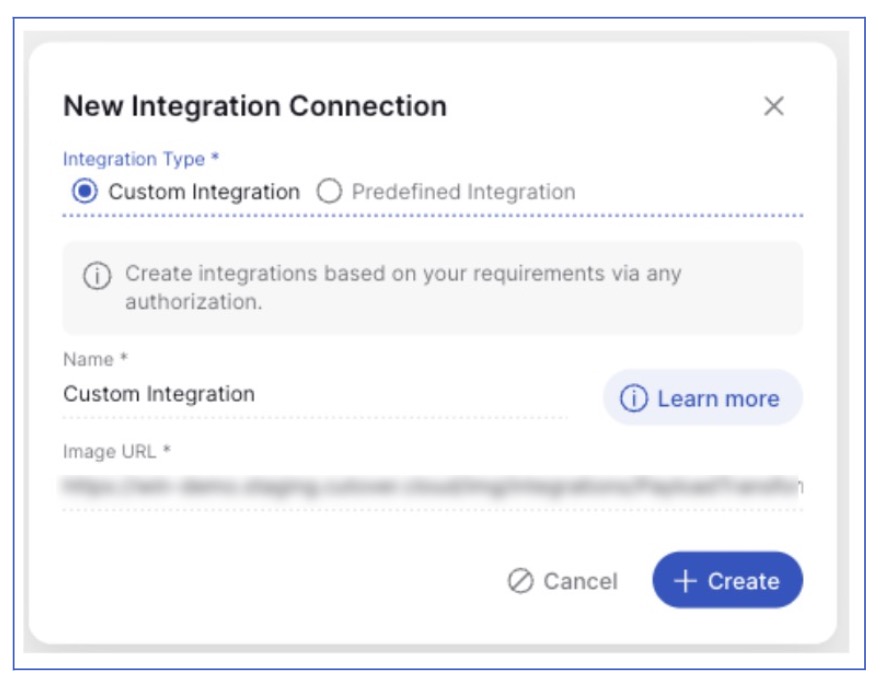
6. If you select the Predefined Integration radio option, select an integration from the Integration dropdown list. The information required will change depending on the integration chosen. Enter any mandatory fields and click Create.

The newly created integration will be listed at the bottom of the Integrations Connections page.
Note: As this guide is based on our Custom Integration, please see our Help Center for further information on setting up any predefined integrations.
7. If you select the Custom Integration radio option, you will need to enter a name and (optionally) an image URL for your integration (if this is left blank, a default image URL will be displayed). Click CREATE.
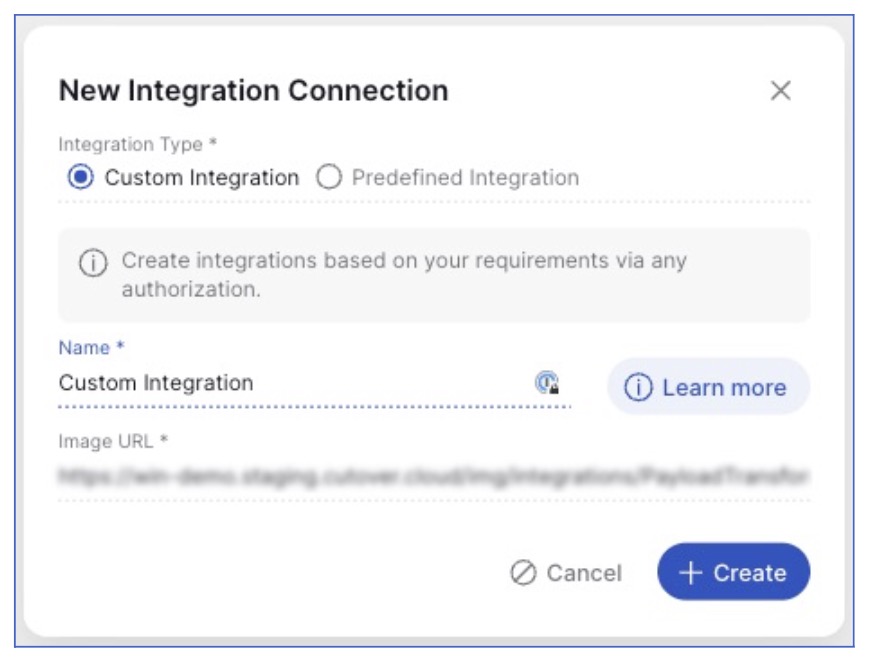
The newly created integration will be listed at the bottom of the Integrations Connections page.
Add an integration action
This section will cover the following example where you can use a Cutover task to create an issue, then poll for the Status in Jira.
To do this, add an integration action to your newly created custom integration connection by following these steps:
1. In Settings > Integrations, click on your new custom integration from the list in the Integration Connections screen.
2. In the Edit panel, click + New in the Integration Actions section.

3. In the new action modal, select Build a custom integration from the Action dropdown.
General tab
In the General tab, enter the following details:
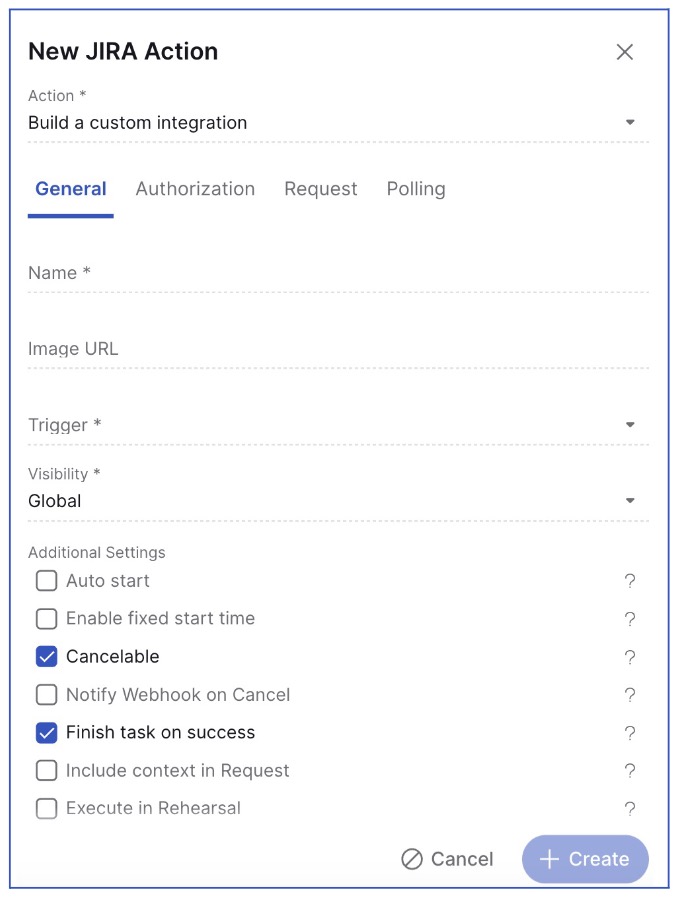
Name: Enter a name for your integration action. In our configuration, we have used the integration action name 'Create an issue'.
Image URL: This is the image of the icon that is associated and displayed with the integration action, in this example we have used our Jira image - but you are able to choose an image url of your choice.
Trigger: Select On Task Start.
Visibility: Select which workspace(s) you would like your integration action to appear or select global for your integration to appear in all workspaces.
Additional Settings: Ensure that Cancelable and Finish task on success are selected. These two options are used for the example being configured in this guide, however you may want to add additional options.
Click CREATE.
Create custom fields
Before filling out the rest of your integration action, you will need to set up your custom fields. These are the custom fields which relate to the four Jira fields mentioned in the Prerequisites section above. These custom fields will match up with our mandatory fields when creating an issue in Jira.
Note: This is an example of our configuration, but please note that you are able to choose which parameters you would like based on your requirements.
In order to create your custom fields, you will need to make sure you have the Custom Fields Admin role.
Note: You can read more about creating custom fields in our Help Center.
To create a custom field:
1. Click Settings>Custom Fields.
2. Click the + icon in the bottom right to add a new custom field.
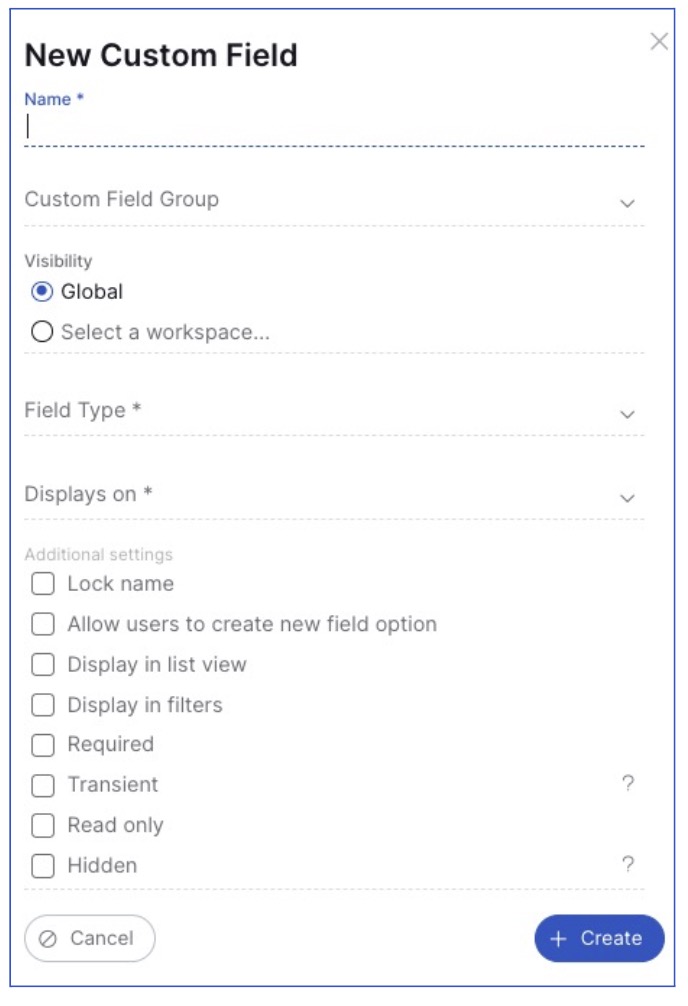
3. Add your custom field name
4. Select the visibility of your custom field
5. Select the field type (please note for single-select you will need to add the field options in there)
6. In the displays on field - select task edit
7. Under ‘Restrict to integration’, select your integration action
8. For additional settings, choose which properties fulfil your use case - in this example we have chosen Transient (this means any values stored will not be duplicated or copied) and Required.
9. Click Create. You should repeat this for all of the custom fields required for your integration.
Below is a list of the custom fields, fields types and additional settings. This information should be entered when creating the custom fields in the above example:
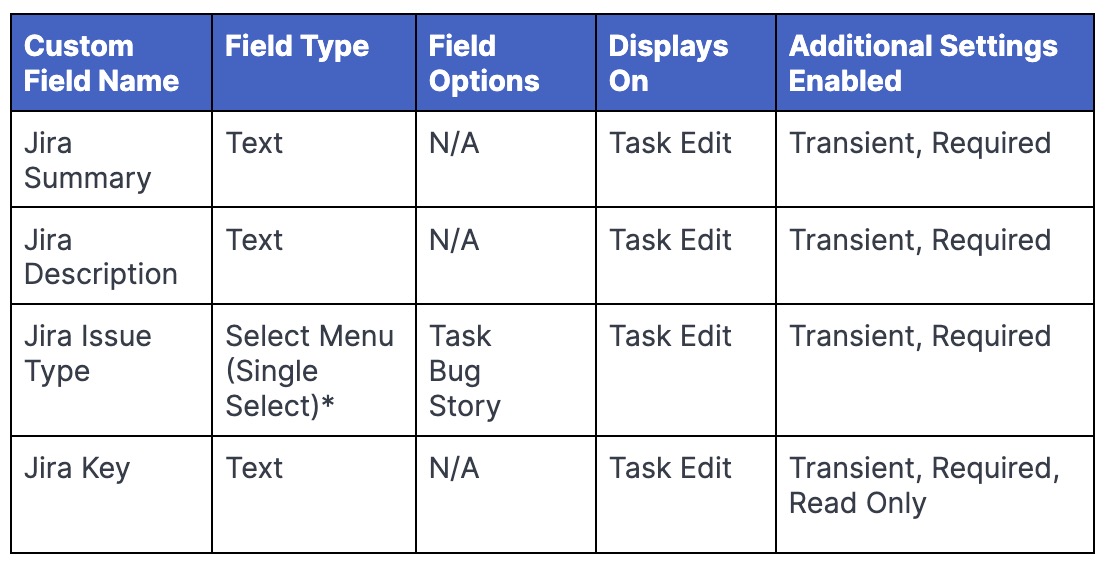
Once the above steps are completed, you can navigate back to your integration action - Settings > Integration connection > Integration Action settings.

Authorization tab
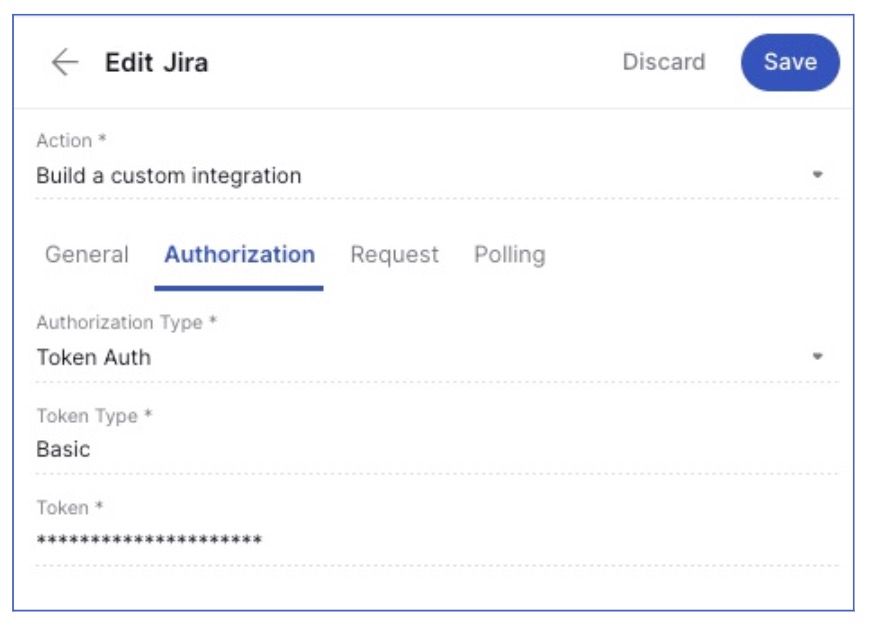
Fill out your Authorization tab, in this example we are using Basic authorization.
1. Select your Authorization Type
2. Fill in your Token Type
3. Fill in your Token
4. Click Create
Request tab
1. Select your chosen request type, in this example we are using a HTTP POST request.
2. Fill in your URL: Enter the API URL of your Atlassian instance (for example, https://<your-domain>.atlassian.net/rest/api/[insert latest API version]/issue)
3. In the request header, fill in your request headers as defined by Jira. In this example we have elected to have the Authorization at the header level (you can also use the Authorization tab):
{"Content-Type":"application/json","Accept":"application/json"}
4. Fill in your outbound payload (please note this is an example of our payload using our required fields):
{"fields":{"project":{"key":"CP"},"summary":"{{CustomField['Jira Summary']}}","description":"{{CustomField['Jira Description']}}","issuetype":{"name":"{{CustomField['Jira Issuetype']}}"},"Labels":[]}}
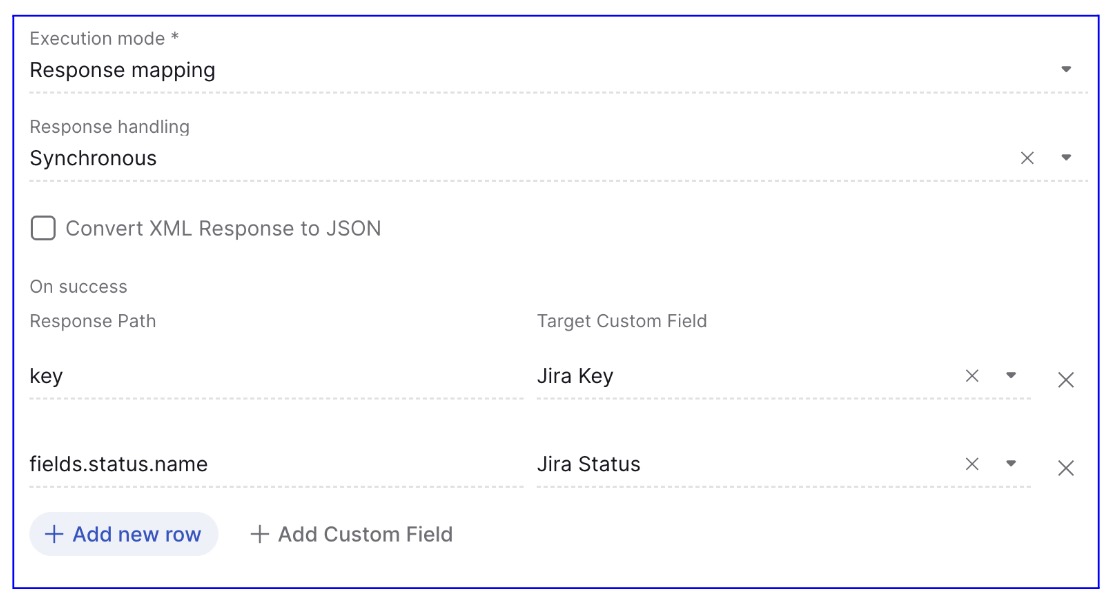
5. In the ‘Execution mode’, set this to response mapping as this example will return the newly created Issue Key.
6. Set the ‘Response handling’ to be synchronous as we want the response to be returned immediately.
7. Click ‘Add new row’ under the ‘On success’ section to insert your response parameters
8. In this example we use the Jira Key and Jira Status custom fields.
Note: Please adjust the response path to adhere to your Jira api, for this example the status name sits under the path fields>status>name so we have set the path to be fields.status.name.
Polling tab
1. Tick ‘Use Polling’
2. Set the request type to GET (as we want to retrieve the Jira status from the Jira Key)
3. URL: Enter the API URL of your Atlassian instance (for example: https://<your-domain>.atlassian.net/rest/api/[insert latest API version]/issue/{{CustomField['Jira Key']}}
Note: We have used dynamic fields in the URL for the Jira Key as this already exists since the Create Jira integration action included the creation of this custom field — as a result, this field will need to be included, but won’t need to be created again.
4. Set the ‘Request headers’ to be the same as used in the Request tab e.g:
{"Content-Type":"application/json","Accept":"application/json","Authorization":"Basic TOKEN="}
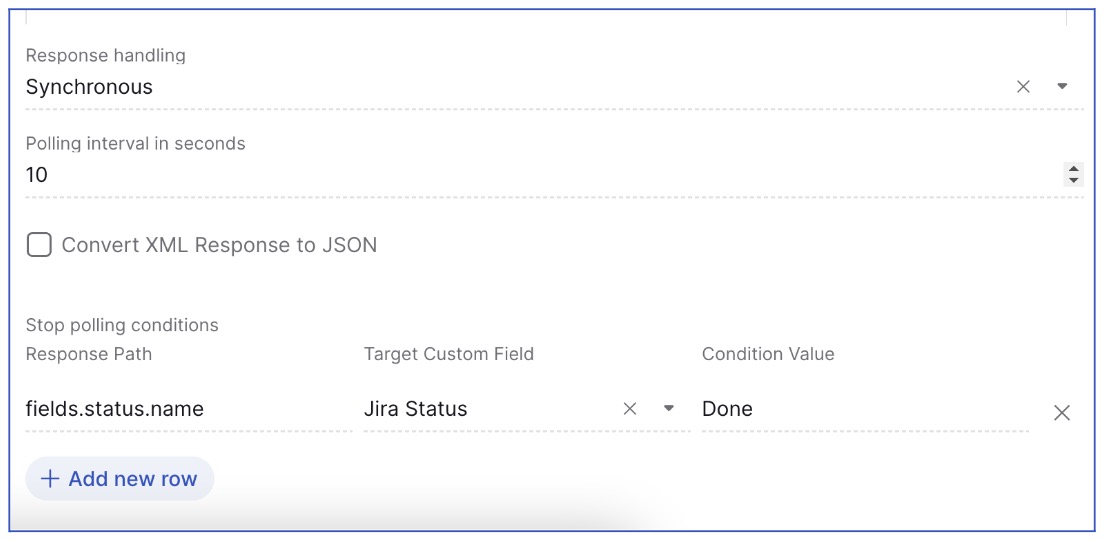
5. Set the ‘Response handling’ to Synchronous
6. Set the polling interval to your requirements, in this example we have set this up to poll for the status every 10 seconds
7. Set your ‘stop polling condition’. For this example we have chosen to poll for just the status and have set the condition value to ‘Done’. This means that when the Issue status is ‘Done’ the Cutover task will complete.
8. Click Save.
Next steps
In this guide you have learned how to successfully build and set up the Jira integration. By following the steps, you should now have a functional integration. You should thoroughly test your integration and address any issues that may arise during the testing phase.
We encourage you to maintain detailed documentation of your integration configuration and any changes you make in the future. This will be invaluable for troubleshooting and maintenance.
If you are interested in integrations and would like to create further integrations in Cutover, please get in touch with your Customer Success Manager (CSM).
If you would like to know more about Cutover please contact info@cutover.com.
Thank you for using this guide, and we wish you every success with your integration project. If you have any feedback or suggestions for improving this documentation, please feel free to send it to docs@cutover.com.
