Request settings
Last updated: November 13th, 2025
This module defines request properties, such as the type of HTTP request, request headers, and payload. It handles the response and allows mapping of response values to predefined custom fields. Please follow our step-by-step guide below or watch our video to find out more.
The Request Settings tab structures “HTTP” requests and handles responses from third party APIs. Please follow our step-by-step guide below or watch our video to find out more.
Use Cutover Connect: When Use Cutover Connect is selected, the “Request type” and “URL” fields are hidden. Using this option determines that requests should be routed through Cutover Connect, rather than directly to a specified URL.
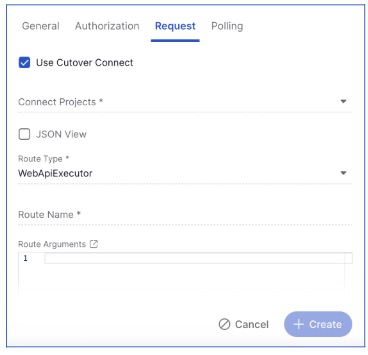
Enter the following information into the appropriate fields:
- Connect Projects: Select a project from the dropdown list.
- JSON View: Use this option to enter your full outbound payload in JSON format. This feature is designed for power users familiar with the message formats supported by Cutover Connect.
- Route Type: Choose WebApiExecutor or Script Executor.
- Route Name: This must match the route name configured in the webapi-routes.yml file installed in Cutover Connect. The value tells Cutover Connect which API to execute.
- Route Arguments: Provide route arguments in JSON format. Custom fields can be interpolated if needed.
- Response Type: Choose one of the following options:
- HTTP – HTTP options are pre-populated. The bearer token used for the callback must be entered manually or loaded from parameters.
- Lambda
- Lambda with S3 – S3 options are pre-populated; update the CHANGE ME fields with the correct values.
- None
Execution mode: See this heading further down.
Notes:
When using Cutover Connect, the Response Handling setting is hidden, as the integration assumes it will always wait for a callback.
The integration waits for a request from an external service to a callback URL provided by Cutover. Success or failure is determined by the status parameter appended to the callback URL.
On the Polling tab, the same fields apply as in the Request. The only difference is the additional Use Polling checkbox.
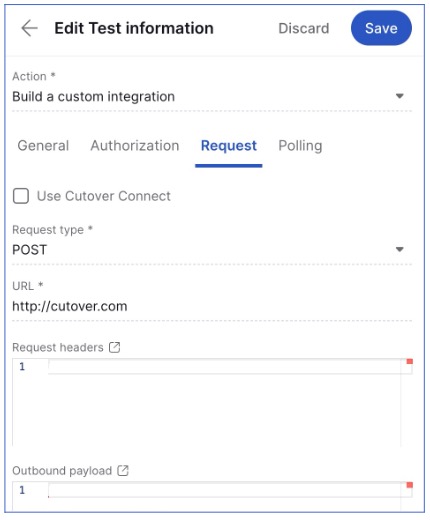
Request Type
Request type options “POST,“ “PUT,“ “PATCH“, “DELETE” or “GET“.
- When POST, PUT, or PATCH is selected, 'Request headers' and 'Outbound payload' settings are displayed.

- When GET or DELETE is selected, 'Request headers' and 'Request parameters' settings are displayed.

URL
Enter the URL of the request e.g. https://<your-domain>.atlassian.net/rest/api/[insert latest API version]/issue)

Note: The URL field can use variables in order to customize the endpoint. Please see the Variable endpoints section at the end of this page for further information about this.
Execution mode
When firing the integration (e.g. “On Task Start“), a request is made to the location defined in either 'URL' or 'SQS URL' fields. The settings defined in 'Request headers', 'Outbound payload', or 'GET parameters' are used in this outbound request.

What happens next depends on the execution mode:
Fire and forget: When this option is selected, the request is made and the integration is successful if the response is in the 200 range, otherwise it fails. No further action is performed.
Response mapping: When this setting is selected, the request is made and the integration expects to handle an inbound response. The response can be handled synchronously or from a callback invoked by an external service. This is defined in the Response handling section below.
Response handling
When the execution method is 'HTTP' and the execution mode is 'Response mapping', the 'Response handling' setting is displayed.
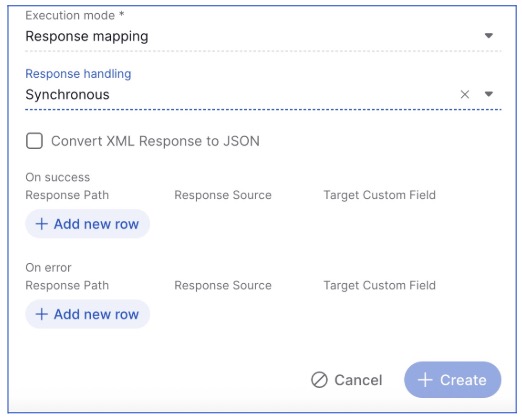
The response mapping settings “On success“ and “On error“ are provided to map response data to a custom field in Cutover.

Synchronous: This setting assumes that the desired response will be returned immediately in reply to the outbound request. In other words, the external service provides the information required for response mapping in its response to the POST, PUT, PATCH or GET request.
Wait for callback: This setting assumes that the response to the initial request is ignored and the integration waits for a request from an external service to a callback URL provided by Cutover. This callback URL is automatically generated when provided in the “Outbound payload,“ described further below. The integration is set to a “running” state. This behavior is mostly associated with integrations that are handled by a lambda, which receives information from a downstream service and then forwards this information to Cutover via the callback URL.
Request headers, Outbound payload, and GET/Request parameters
These settings customize headers, payload, or parameters sent with the initial request and must be formatted as JSON objects. The code editor checks that the JSON is correctly formatted and displays error markers if there are any mistakes.
Request headers: Allows specification of request headers. Here you can specify a bearer token in the header for authentication with external services. For instance:
{"Content-Type": "application/json", "Authorization": "my-bearer-token"}
Note: Most APIs require “Content-Type“ to be defined and will error if none are provided. Make sure to set the value as “application/json“ as this is the format for the submitted content.
Request parameters: The parameters sent along with an 'HTTP' execution method of type 'GET' or 'DELETE'. These parameters are defined by the external API and can include, for instance, variables for searching, pagination, or sorting.
Outbound payload: The payload that is sent with the request body, applicable requests of type 'POST', 'PATCH', and 'PUT'.
Here is an example of a simple payload:
{"my_key":"my_value"}
The JSON can include variables that are processed in the backend. For instance, if you would like to pass the task ID in the payload, you can add the Task.id variable inside double curly braces, as follows:
{"my_task_id":"{{Task.id}}"}
Here is an example with custom fields:
{"Job_name":"{{CustomField['Job name']}}","Build_parameters":"{{CustomField['Build parameters']}}"}
Custom Integration variables
The following table describes the available variables.
The following is an example outbound payload:
{"some_key":"my_static_value","callback_url":"{{IntegrationAction.update_response_mapping_callback_url}}","integration_action_id": "{{IntegrationAction.id}}","task_internal_id": "{{Task.internal_id}}","some_custom_field": {{CustomField['My custom field name']}}"}
XML to JSON conversion
Convert XML Response to JSON: Mark this checkbox if the expected response from the third party service is provided in XML format. The response will be converted to JSON format so it can be used in response mappings.

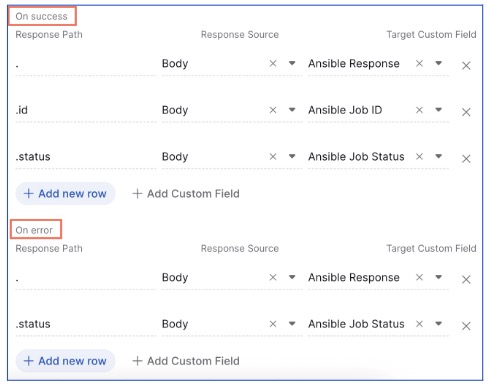
Response mapping ("On success" and "On error)
Response mappings let you extract data returned from an external service and store it in custom fields associated with your integration. Each mapping row consists of:
- Response Source – where the data should be extracted from (Headers or Body)
- Response Path – the path to the value (using dot notation)
- Target Custom Field – the custom field that will store the value
You can add multiple mappings by selecting Add New Row. To delete one, click the X next to it.
Choose whether to extract from Headers or Body
Each mapping row includes a Response Source dropdown that lets you specify where the value should come from:
- Body – extracts the value from the HTTP response payload (default, and identical to previous behavior)
- Headers – extracts the value from the HTTP response headers
This new option appears in both the Request and Polling tabs. You can mix and match rows as needed—some can extract from headers and others from the body.
Example: Mapping values from the Body
If your external service returns:
{"foo": {"bar": "foo.bar value","baz": "foo.baz value"},"error": "error value"}
You can could configure mappings like:
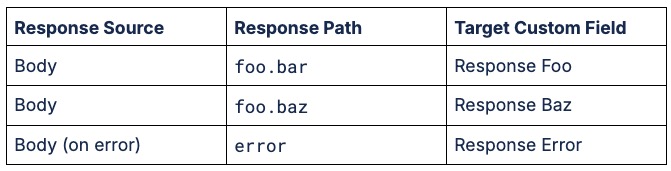
Note: In this example, all values are extracted from the Body of the response. With the Response Source option, you can extract values from Headers when your external system returns important data there.
Example: Mapping values from Headers
If the external system returns an identifier in the headers (for example job_id), you can set:

This is especially useful when systems return metadata (such as IDs, status codes, or pagination info) via response headers instead of in the payload.
When to use Headers vs Body
- Headers:
- Metadata like job IDs, status codes, correlation IDs
- Pagination tokens or other response info in headers
- Flat values, no dot notation needed
- Use when data is not in the payload
- Body:
- Structured JSON data or nested fields (use dot notation)
- Error messages, status, or detailed response content
- Matches previous default behavior
Quick tip: Use Headers for metadata, Body for application data.
Custom field handling on integration execution
When the Custom Integration runs in a runbook, the mappings populate custom fields with values from the response. For example, “Response Foo” will contain the value "foo.bar value".
Routing to success or error mappings
- If Response Handling is set to Synchronous, success mappings are used if the response status is in the 200 range; otherwise, error mappings are applied.
- If Response Handling is set to Wait for callback, success and error mappings are controlled by a status query parameter appended to the callback URL:
- Status 200 routes to On success mappings
- Status 400 routes to On error mappings
Example callback URLs:
[outbound payload callback URL]&status=200 → routes to On success
[outbound payload callback URL]&status=400 → routes to On error
Variable endpoints
A recurring integration pattern is to make a call to an endpoint that is dependent on a variable such as the value of a custom field.
Note: Variable endpoints are generated by dynamic fields. You can read more about Dynamic fields in our help center here.
Consider the following scenario. You are making a GET HTTP call to an API that requires some object ID to be passed in the endpoint (URL), for instance https://third-party-api/object/11.
You might wish to define the object ID at the task level, in order to reuse the integration to access similar endpoints but with different object IDs, instead of creating a new integration for every object endpoint.
This can be done by storing the object ID in a custom field that is defined at the task level. To illustrate, say the ID is stored in a custom field named “Object ID.“ Your endpoint would then take the following form:
https://third-party-api/object/{{CustomField['Object ID']}}
In this manner, the value stored in the task custom field 'Object ID' will be substituted/interpolated in the endpoint when the integration is fired. Every task can define its own value for the custom field so that the same integration has the flexibility of accessing different objects in the external API.
In fact, any variable from the “Custom integrations variables“ table described previously can be interpolated in the URL fields.