Polling settings
Last updated: November 13th, 2025
The Polling settings tab defines repeated HTTP requests to an endpoint. Please follow our step-by-step guide below or watch our video to find out more.
The endpoint defined in the “URL“ field of this tab is polled at defined intervals until a certain condition is met.
Use Cutover Connect: On the Polling tab, when using Cutover Connect, the same fields apply as in the Request setup described here. The only difference is the “Use Polling” checkbox, which is also available for other non-Connect request types.
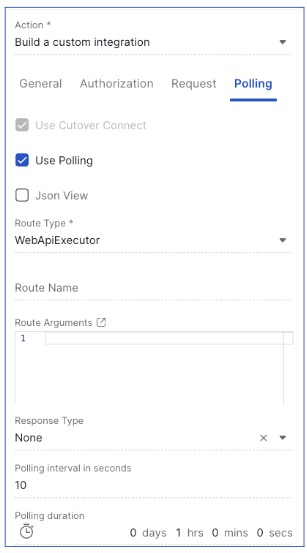
Use Polling: If the “Use Polling” checkbox is selected, consecutive polling requests are performed after the initial request defined in the “Request“ tab is completed.

Json View: Use this option to enter your full outbound payload in JSON format. This feature is designed for power users familiar with the message formats supported by Cutover Connect.
Request type
Please select either 'GET' or 'POST'.

URL
The URL to be called with each polling request e.g ‘https://<your-domain>.atlassian.net/rest/api/issue/[issue id or key]’

Note: The polling URL can also use variables to customize the endpoint. Please see the “Variable endpoints“ section on the Request page for further information about this.
Request headers, Outbound payload, and GET parameters
These settings customize headers, payload, or parameters sent with each polling request and must be formatted as JSON objects.
Note: The behavior of these settings is the same as described in the Request page tab. Please refer to the corresponding section, as well as the description of how to use “Custom integration variables“ in these fields.
Request headers: specifies request headers for the polling request.
Outbound payload: specifies the payload to be sent with a polling request of type POST.
GET parameters: specifies parameters to be sent with a polling request type of GET.

Polling Response handling

The following options are displayed:
Synchronous: This setting assumes that the desired response will be returned immediately in reply to the outbound polling request. In other words, the external service provides the information required for the “Stop polling conditions“ mapping in its response to the POST or GET request.
Wait for callback: This setting assumes that the response to the initial request is ignored and the integration waits for a request from an external service to the polling callback URL provided by Cutover. This callback URL is automatically generated when provided in the “Outbound payload” as described in the “Custom Integration variables“ section of the Request page.
Polling interval and retries
Polling interval in seconds: Defines the number of seconds elapsed between each execution of the polling request. The default is set to 30 seconds (although this can be longer), however it cannot be under 1 second. This option displays if you selected Synchronous as a Response handling option.

Polling maximum retries: Defines the maximum number of retries. The default value is set to 120 retries and this can be configured as per your requirements, but it cannot be a negative number. Once the integration has reached it's maximum retries limit, you are able to refire the integration to start the polling again.
XML to JSON conversion
Convert XML Response to JSON: Mark this checkbox if the expected response from the third party service is provided in XML format. The response will be converted to JSON format so it can be used in response mappings.

Stop polling conditions
Once polling requests start, they will continue to be scheduled and executed until specified stop conditions are met. These conditions are defined through an array of custom field mappings and expected values.
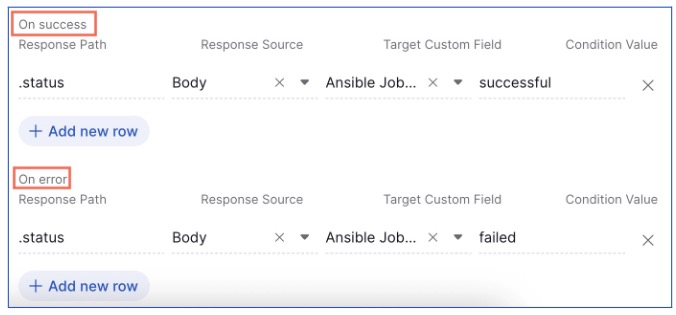
To add a condition, click Add New Row. Each condition consists of:
- Response Source: Select where to extract the value from in the API response—either Headers or Body.
- Response Path: The path to a property in the API response (using dot notation) retrieved either synchronously or through a callback.
- Target Custom Field: A custom field in Cutover that will store the extracted value.
- Condition Value: The value that, when matched with the extracted response value, will signal to stop polling.
Example
Suppose you poll an endpoint returning a response like:
{status: "continue"}
The "status" value will be stored in the custom field Job Status. Polling will continue until the status equals either "successful" or "failed", at which point polling stops and the integration completes successfully.
Setting up failure values
You can define failure conditions in the Polling tab using the On error section.
Add the Response Source, Response Path, Target Custom Field, and Condition Value for which the integration should stop and mark as failed.

Press Save to apply your settings. The integration will continue running until the stop or failure condition is met. If a failure condition is triggered, the associated task will display a failure message.

Next steps
You can now set up a Custom Integration. By following the steps, you are now ready to add your integration action. You should thoroughly test your integration and address any issues that may arise during the testing phase.
We encourage you to maintain detailed documentation of your configuration and any changes you make in the future. This will be invaluable for troubleshooting and maintenance.
If you are interested in integrations and would like to create further integrations in Cutover, please get in touch with your Customer Success Manager (CSM). If you would like to know more about Cutover please contact info@cutover.com.
Thank you for using this guide, and we wish you every success with your integration project. If you have any feedback or suggestions for improving this documentation, please feel free to send it to docs@cutover.com.